오래된 iMac이
맥북의 5K 모니터로

Turn your old iMac into
a 5K display for your Mac

썬더볼트/USB4 케이블이 가장 좋고, 이더넷·Wi-Fi로도 연결됩니다. 저지연 HEVC 스트리밍으로 진짜 외장 모니터처럼.

Best over a Thunderbolt/USB4 cable — and it also works over Ethernet or Wi-Fi. Low-latency HEVC streaming makes it feel like a real external display.

7일 무료 체험 · 이후에도 다른 앱보다 저렴 · 신용카드 결제

7 days free · cheaper than the alternatives · pay by card

📦 하나의 파일 안에 두 앱이 들어있어요 — iMac엔 DuoScreen Receiver, 맥북엔 DuoScreen을 설치하세요.

📦 One download contains both apps — install DuoScreen Receiver on the iMac and DuoScreen on your Mac.

MacBook ⌁ 수신 대기…⌁ Waiting… 5K iMac Thunderbolt / USB4
썬더볼트·이더넷·Wi-FiThunderbolt · Ethernet · Wi-Fi
5K 확장 화면5K extended display
맥북으로 제어 · 소리까지Control from your Mac · audio too
① 케이블 연결① Plug in cable ② 수신앱 실행② Run receiver ③ 확장 화면 표시③ Screen appears ④ 맥북으로 제어④ Control from Mac
⚡ 썬더볼트Thunderbolt최고 화질·최저지연best quality · lowest latency 이더넷Ethernet좋음good 📶 Wi-Fi가능works

썬더볼트 케이블이 가장 좋지만, 이더넷·Wi-Fi로도 연결됩니다 · 화질·속도 썬더볼트 > 이더넷 > Wi-Fi

A Thunderbolt cable is best, but it also works over Ethernet & Wi-Fi · quality & speed Thunderbolt > Ethernet > Wi-Fi

🎁 8월 리뷰 이벤트 — 무료 라이선스 10개

🎁 August Review Event — 10 Free Licenses

DuoScreen 실사용 후기를 올려주시면, 선착순 10분께 DuoScreen Standard 정식 라이선스($24.99)를 무료로 드립니다.

Post an honest review of DuoScreen and the first 10 participants get a full DuoScreen Standard license ($24.99) — free.

✍️

1. 후기 올리기

1. Post a review

자주 쓰는 커뮤니티·블로그·포럼에 실사용 후기를 올려주세요(스크린샷·사용 환경 포함 환영). 형식 자유, 솔직한 후기면 됩니다.

Post an honest, hands-on review to any community, blog, or forum you use (screenshots and your setup welcome). Any format is fine.

📮

2. 링크 보내기

2. Send the link

게시글 링크를 [email protected] 으로 보내주세요. 제목에 [DuoScreen 리뷰 이벤트]를 적어주시면 빠릅니다.

Email the link to [email protected] — put [DuoScreen Review Event] in the subject.

🔑

3. 토요일에 받기

3. Get it Saturday

매주 토요일에 검수 후 일괄 발송합니다(8/8·8/15·8/22·8/29, 마감분 9/5). 메일로 받은 1회용 100% 할인 코드로 결제($0)하면 라이선스 키가 자동 발송됩니다.

Codes go out in a weekly batch every Saturday (Aug 8/15/22/29, final batch Sep 5). Check out with your single-use 100% off code ($0) and the license key arrives automatically.

📋 꼭 확인해 주세요
· 기간: 2026년 8월 1일 ~ 8월 31일 (선착순 10명 마감 시 조기 종료 · 1인 1회)
· 후기에 “DuoScreen 무료 라이선스 이벤트에 참여하며 작성했다”는 사실을 꼭 밝혀주세요. 대가성 후기 공개 원칙이며, 특히 해외 커뮤니티(Reddit 등)에서는 필수입니다. 각 커뮤니티의 홍보 규정도 함께 지켜주세요.
· 접수된 후기 링크는 아래 ‘사용자 후기’ 섹션에 공개됩니다. 공개를 원치 않으시면 메일에 적어주세요.
· 이미 라이선스가 있으신 분은 선물용 코드로 드립니다. 무성의한 복사 후기는 제외될 수 있습니다.

📋 Please read
· Period: Aug 1 – Aug 31, 2026 (ends early once 10 licenses are claimed · one per person)
· Please disclose in your review that it was written as part of the DuoScreen free-license event. This is standard practice for incentivized reviews and required on many communities (e.g., Reddit). Please also follow each community's self-promotion rules.
· Submitted links will be featured in the ‘User reviews’ section below. If you'd rather not be listed, say so in your email.
· Already own a license? We'll send you a gift code instead. Low-effort copy-paste posts may be excluded.

사용자 후기

User reviews

이벤트로 접수된 실사용 후기들입니다.

Hands-on reviews submitted through the event.

아직 등록된 후기가 없습니다 — 첫 번째 후기의 주인공이 되어주세요! 🎉

No reviews yet — be the first! 🎉

핵심 기능

Features

🪟

앱 창 (2.0 신규)

App window (new in 2.0)

두 Mac이 그림으로 나오고 연결선이 방식에 따라 바뀝니다(썬더볼트·USB4·이더넷·Wi-Fi) — 실시간 전송 속도까지. 기기 그림은 실제 기종(맥북·맥미니·맥스튜디오)에 맞춰지고, 아래 한 줄에서 모드·소리·밝기·화면 위치·성능을 바로 조절합니다. 라이트/다크 지원, 메뉴 막대는 요약 + 창 열기(⌃⌘D).

Both Macs drawn side by side, with the link changing to match how they're connected (Thunderbolt, USB4, Ethernet, Wi-Fi) and the live transfer rate. The art matches your actual Mac (MacBook, Mac mini, Mac Studio), and one row below adjusts Mode, Sound, Brightness, Arrangement and Performance. Light and dark; the menu bar keeps a summary plus "Open window" (⌃⌘D).

🖥️

5K 레티나 확장 · 해상도 자동 맞춤

5K Retina extension · auto-matched

가상 디스플레이로 진짜 두 번째 모니터를 추가합니다. 2.0부터는 아이맥의 실제 화면 크기에 맞춰 만들어져 글자·아이콘이 원래 크기로, 더 또렷하게 보입니다.

A real second display via a virtual display — and from 2.0 it's built to your iMac's actual screen size, so text and icons are their proper size and sharper.

⚡

저지연 · 고화질

Low latency, sharp

VideoToolbox HEVC 하드웨어 인코딩 + 썬더볼트 직결로 부드럽고 선명하게. 커서는 즉각 반응.

Hardware HEVC encoding over a direct Thunderbolt link — smooth and crisp, with an instant cursor.

🔊

소리 출력 선택 · 볼륨키 제어

Sound output picker · volume keys

소리를 아이맥 / 이 Mac / 둘 다 중에서 선택하고, 에어팟·스피커 등 원하는 출력 장치를 메뉴에서 바로 지정. 이어폰을 꽂으면 자동 전환, 맥북 볼륨키로 iMac 볼륨을 조절하며 맞춘 음량은 기억되어 재연결 후에도 그대로 유지됩니다.

Choose where sound plays — iMac / this Mac / both — or pick a specific device (AirPods, speakers) right from the menu. Headphones switch automatically, your Mac's volume keys control the iMac volume, and the level you set is remembered across reconnects.

☀️

아이맥 밝기 조절

iMac brightness control

메뉴 슬라이더로 아이맥 밝기를 직접 조절하거나, '맥북과 동기화'를 켜면 키보드 밝기 키에 아이맥이 같은 밝기로 따라갑니다.

Adjust the iMac's brightness with a menu slider — or turn on Sync with MacBook and it follows your keyboard brightness keys.

🌙

절전과 한 몸

Sleeps & wakes with you

맥북 화면이 꺼지면 아이맥 화면도 함께 꺼지고, 깨어나면 약 1초 만에 다시 연결됩니다. 문제가 생겨도 앱이 스스로 복구합니다.

When your MacBook's display sleeps, the iMac's does too — and waking reconnects in about a second. The app recovers on its own if anything goes wrong.

🩺

연결 진단 · 실시간 전송률

Diagnostics · live throughput

연결 종류(썬더볼트/이더넷/Wi-Fi), 케이블 협상 속도, 실시간 전송 속도(Mb/s)를 한눈에 — 문제가 있으면 해결 방법까지 알려줍니다.

See the link type (Thunderbolt/Ethernet/Wi-Fi), negotiated cable speed and live transfer rate (Mb/s) at a glance — with fix-it tips when something's off.

자동 연결 · 썬더볼트 우선

Auto-connect · Thunderbolt-first

두 앱을 켜면 서로 찾아 바로 연결. 썬더볼트를 우선하고, 빠지면 이더넷·Wi-Fi로 자동 전환. 설정은 기억됩니다.

Launch both apps and they connect automatically. Prefers Thunderbolt, falls back to Ethernet/Wi-Fi if unplugged. Settings are remembered.

↔️

위치 자유 배치

Place it anywhere

확장 화면을 좌/우/위/아래 어디든 배치. 미러링 모드도 지원.

Arrange the extra screen left/right/top/bottom. Mirroring mode too.

🛡️

안전한 종료

Clean exit

케이블을 뽑거나 연결이 끊기면 iMac은 즉시 원래 화면으로 돌아갑니다.

Unplug the cable and the iMac returns to its own desktop right away.

📸

확장 화면 캡처

Capture the extra screen

macOS 기본 스크린샷(⌘⇧4)이 아이맥 화면에서도 그대로 됩니다. 거기에 아이맥 화면만 한 번에 담는 단축키를 더했습니다 — 전체(⌃⌥⌘4), 영역 선택(⌃⌥⌘5). 영상이 아니라 원본에서 떠서 화질 손실이 없습니다.

The macOS screenshot you already use (⌘⇧4) works on the iMac screen too. On top of that, two shortcuts grab the iMac screen in one go — full (⌃⌥⌘4) and drag a region (⌃⌥⌘5). Captures come from the original framebuffer, not the video stream, so there is no quality loss.

⬆️

자동 업데이트

Auto-update

새 버전이 나오면 메뉴에서 클릭 한 번으로 받아서 교체·재시작까지 자동. 하루 두 번 자동 확인.

New versions install with one click from the menu — download, replace, relaunch, all automatic. Checks twice a day.

🌐

한국어 · 영어

Korean · English

macOS 시스템 언어에 따라 한국어/영어가 자동 적용됩니다.

Follows your macOS system language automatically (Korean / English).

세 가지 사용 모드

Three ways to use it

맥북 메뉴바 아이콘에서 언제든 바꿀 수 있습니다.

Switch anytime from the menu-bar icon on your Mac.

🖥️➕

확장 모드 (기본)

Extended mode (default)

iMac이 두 번째 모니터가 됩니다. 맥북 화면은 그대로 두고, 창을 iMac으로 끌어다 더 넓게 쓰세요. 위치는 좌/우/위/아래로 배치할 수 있습니다.

The iMac becomes a second monitor. Keep your Mac's screen as-is and drag windows over for more space. Place it left/right/top/bottom.

🪞

미러 모드

Mirror mode

맥북 화면을 iMac에 똑같이 복제합니다. 발표·시연이나 같은 화면을 둘이 함께 볼 때 좋습니다.

Shows an exact copy of your Mac's screen on the iMac — great for presentations or sharing one view with someone.

💻🔅

클램셸 모드

Clamshell mode

맥북 덮개를 닫아도 잠들지 않게 해서, iMac 화면 하나만으로 작업합니다. 맥북을 치워두고 iMac을 메인 모니터처럼 쓰고 싶을 때.

Keeps your Mac awake with the lid closed, so you work on the iMac screen alone — perfect for tucking the MacBook away and using the iMac as your main display.

PRO · 출시PRO · OUT NOW

아이맥은 더 이상 모니터가 아닙니다

Your iMac stops being just a monitor

케이블 하나로 이어진 아이맥이 맥북의 두 번째 컴퓨터가 됩니다 — 파일도, 포트도, 못 돌리던 x86도, 녹화·방송까지 아이맥이 대신합니다.

The connected iMac becomes your MacBook's second computer — files, ports, the x86 your Mac can't run, even recording and streaming, all handled by the iMac.

available MacBook Thunderbolt · Wi-Fi iMac USB drive Thunderbolt SSD Android phone

아이맥에 꽂은 것들이 맥북에서 바로 — 속도는 연결 방식(썬더볼트 > Wi-Fi)에 따라 달라집니다.

What's plugged into the iMac shows up on the MacBook — speed depends on the link (Thunderbolt > Wi-Fi).

01 · 둘째 MAC
01 · SECOND MAC

아이맥을 맥북 화면 속에서 그대로 조작

Run & control the iMac inside your MacBook

아이맥에서 돌아가는 앱을 맥북 화면 속 작은 창에서 마우스로 조작합니다. 썬더볼트라 5K도 렉 없이 매끄럽게 — 와이파이 화면공유의 답답함이 없습니다.
예: 자리에서 일어나지 않고, 아이맥에 열어둔 편집본·회계 프로그램을 맥북에서 바로 이어서 작업.

Control apps running on the iMac from a small window on your MacBook. Thunderbolt keeps even 5K smooth — none of the lag of Wi-Fi screen sharing.
Example: keep working on the iMac's editor or accounting app right from your MacBook, without getting up.

iMac 5K · 지연 없음5K · no lag MacBook iMac 화면iMac screen
02 · x86 워커
02 · x86 WORKER

M2가 못 돌리는 x86를, 아이맥이 네이티브로

The x86 your Mac can't run — the iMac runs it natively

M2(ARM)가 Rosetta로 느리게 흉내내던 amd64 도커 이미지·x86 앱을, 인텔 아이맥이 네이티브 속도로 대신 빌드·실행합니다.
예: 회사 amd64 컨테이너를 맥북에서 명령 한 줄로 아이맥에 빌드 — 맥북엔 아무것도 안 깔고.

The amd64 Docker images and x86 apps your M2 (ARM) only emulates slowly, built and run at native speed on the Intel iMac.
Example: build your company's amd64 container on the iMac with one command from your MacBook — nothing installed locally.

M2 · ARM 느림 · 에뮬Slow · emulated MacBook Intel · x86 iMac x86
03 · 녹화 · 방송
03 · RECORD & STREAM

맥북은 가볍게, 녹화·방송은 아이맥이 떠안기

Keep the MacBook light — the iMac records & streams

맥북 화면·소리는 썬더볼트로 이미 아이맥에 실시간 도착해 있습니다. 아이맥에서 OBS·QuickTime 같은 프로그램으로 그 화면을 고화질로 녹화하거나 유튜브·트위치로 생방송하세요. 화면 캡처·인코딩·업로드라는 무거운 일을 아이맥이 통째로 떠안기 때문에, 정작 게임·작업을 하는 맥북은 발열로 느려지지(스로틀링) 않고 팬도 조용하며 배터리도 덜 닳고, 녹화하느라 프레임이 끊기는 일도 없습니다. 아이맥에 이미 도착한 신호를 쓰는 거라 맥북엔 녹화 프로그램을 깔 필요조차 없습니다.
예: 맥북으로 게임하며 아이맥이 트위치 송출 · 강의·튜토리얼은 맥북에서 진행하고 아이맥이 4K로 녹화 · 확장 화면 전체를 아이맥이 그대로 캡처.

Your MacBook's screen and sound already arrive on the iMac live over Thunderbolt. On the iMac, record in high quality or go live to YouTube/Twitch with OBS, QuickTime, and the like. Because the iMac shoulders all the heavy capture, encoding and uploading, the MacBook you're actually gaming or working on never thermal-throttles, keeps its fans quiet, drains less battery, and never drops frames to the recorder — and since it reuses the signal already on the iMac, you don't even install recording software on the Mac.
Example: game on the MacBook while the iMac streams to Twitch · run a lecture on the MacBook while the iMac records in 4K · capture the whole extended screen from the iMac.

MacBook 시원·가벼움Cool & quiet 화면 · 소리Screen · audio REC iMac YouTube · Twitch
04 · 여분의 포트
04 · SPARE PORTS

맥북 포트가 부족하면, 아이맥 포트를 빌려 쓰기

Out of ports? Borrow the iMac's

요즘 맥북은 USB‑C 포트가 두어 개뿐이라 충전기·모니터만 꽂아도 금세 꽉 찹니다. 외장 SSD·USB 드라이브·안드로이드 폰은 아이맥 포트에 꽂아 두고 맥북에서 그대로 쓰세요 — 파일 열기·저장은 물론, 안드로이드 빌드·설치·디버깅(adb)도 폰을 아이맥에 둔 채 맥북에서 진행됩니다. 맥북의 귀한 포트는 정말 필요한 데만.
예: 맥북엔 충전기만, 폰·SSD·USB 허브는 전부 아이맥에 — 책상 위 케이블 정리도 덤.

Modern MacBooks have just a couple of USB‑C ports — a charger and a monitor already fill them. Keep your external SSD, USB drives and Android phone plugged into the iMac and use them from the MacBook — open and save files, and even build, install and debug Android (adb) with the phone left on the iMac. Save your Mac's scarce ports for what truly needs them.
Example: only the charger on the MacBook; phone, SSD and USB hub all on the iMac — a tidier desk, too.

MacBook 🔌 충전🔌 Charging 포트 여유Ports free 썬더볼트 · Wi‑FiThunderbolt · Wi‑Fi iMac USB SSD 📱폰📱Phone adb

그리고 기본기 — 아래는 케이블만 꽂으면 바로 되는 것들입니다.

And the essentials — these work the moment the cable is connected.

🗂️

간편 파일 공유

Easy file sharing

복잡한 설정 없이, 아이맥에 있는 파일을 맥북에서 바로 열고 저장하세요.

No setup needed — open and save files on the iMac straight from your MacBook.

아이맥 = 맥북의 여분 포트

iMac = extra ports

맥북에 포트가 부족할 때, 아이맥의 USB 포트를 맥북의 포트처럼 활용합니다.

Short on ports? Use your iMac's USB ports as if they were your MacBook's.

⚡

썬더볼트 저장장치

Thunderbolt storage

아이맥 썬더볼트에 연결한 SSD·외장 드라이브를 맥북에서 그대로 사용.

SSDs and drives on the iMac's Thunderbolt port, used right from the MacBook.

🤖

안드로이드 빌드 & 설치

Android build & install

맥북에서 빌드하고, 아이맥 포트에 연결된 안드로이드 폰에 바로 설치·디버깅. 폰을 꽂느라 맥북의 몇 안 되는 USB‑C 포트를 뺏기지 않습니다 — 폰은 아이맥에 두고, 맥북 포트는 충전기·모니터·SSD에 쓰세요. 맥북 포트 부족을 푸는 또 하나의 방법입니다.

Build on the MacBook and install/debug straight to an Android phone plugged into the iMac. It keeps the phone off your MacBook's few USB‑C ports — leave the phone on the iMac and save your Mac's ports for the charger, a monitor, or an SSD. Another way it solves the MacBook's port shortage.

새 x86 미니 PC도, 캡처보드도, 월 구독 클라우드도 필요 없습니다.

No new x86 mini PC. No capture card. No monthly cloud bill.

이미 책상 위에 있는 아이맥이 두 번째 컴퓨터·저장소·녹화기·빌드 서버가 됩니다. Pro는 한 번 결제로 평생 — 구독 없음.

The iMac already on your desk becomes a second computer, drive, recorder and build server. Pro is a one-time purchase, forever — no subscription.

사용법 — 케이블 하나면 끝

How it works — just one cable

썬더볼트 3/4 또는 USB4 40Gbps 데이터 케이블로 두 기기를 직접 연결하세요. (충전 전용 케이블은 안 됩니다.)

Connect the two Macs directly with a Thunderbolt 3/4 or USB4 40Gbps data cable (charge-only cables won't work).

💡 가장 좋은 연결은 썬더볼트 직결(5K 풀성능·최저지연)입니다. 같은 네트워크라면 이더넷·Wi-Fi로도 연결됩니다(속도·지연은 연결 방식에 따라 달라집니다).

💡 Thunderbolt gives the best result (full 5K, lowest latency). On the same network it also works over Ethernet or Wi-Fi (speed & latency vary by connection).

케이블 연결

Plug in the cable

맥북과 iMac의 USB-C(썬더볼트) 포트를 40Gbps 케이블로 직접 연결. macOS가 자동으로 Thunderbolt Bridge를 만듭니다.

Connect MacBook and iMac via their USB-C (Thunderbolt) ports with a 40Gbps cable. macOS forms a Thunderbolt Bridge automatically.

iMac에서 DuoScreen Receiver 실행

Run DuoScreen Receiver on the iMac

창은 뜨지 않습니다 — 정상입니다. 화면 오른쪽 위 메뉴막대의 🖥️ 아이콘이 실행 표시예요(맥북이 연결되면 자동으로 화면이 켜집니다). 최초 1회 화면기록·입력 모니터링 권한을 허용하세요.

No window appears — that's normal. The 🖥️ icon in the menu bar (top-right) means it's running (the screen turns on automatically once your Mac connects). Grant Screen Recording / Input Monitoring once on first launch.

맥북에서 DuoScreen 실행

Run DuoScreen on your Mac

이 앱도 메뉴막대의 🖥️ 아이콘으로 뜹니다(창 없음). 자동으로 iMac을 찾아 확장 모니터로 연결돼요. 아이콘을 클릭해 위치·모드·음소거·캡처를 조절하세요.

This app also lives as a 🖥️ menu-bar icon (no window). It finds the iMac and connects as an extended display. Click the icon to tweak position, mode, mute, and capture.

🖥️

처음이신가요? 창이 안 떠도 정상이에요

First time? A missing window is normal

DuoScreen과 DuoScreen Receiver는 창이 없는 메뉴바 앱입니다. 실행하면 Dock이나 화면에 창이 뜨는 대신, 화면 오른쪽 위 메뉴막대에 🖥️ 아이콘이 생깁니다 — 그게 "실행 중"이라는 뜻이에요. (앱 첫 실행 시 이 위치를 알려주는 안내도 나옵니다.) 아이콘이 안 보이면 메뉴막대가 꽉 찼거나 Bartender 같은 앱이 숨긴 것일 수 있어요.

DuoScreen and DuoScreen Receiver are menu-bar apps with no window. Instead of opening a window, they add a 🖥️ icon to the menu bar (top-right) — that means it's running. (A first-launch note points you to it, too.) If you don't see the icon, your menu bar may be full or an app like Bartender is hiding it.

지원 기기

Compatibility

💻 Mac (송신)

💻 Mac (sender)

  • 모든 Apple Silicon Mac (M1 / M2 / M3 / M4)
  • 맥북 에어·프로 · M시리즈 iMac · Mac Studio · Mac mini · Mac Pro
  • macOS 13 Ventura 이상
  • Thunderbolt 4 / USB4 포트
  • Any Apple Silicon Mac (M1 / M2 / M3 / M4)
  • MacBook Air/Pro · M-series iMac · Mac Studio · Mac mini · Mac Pro
  • macOS 13 Ventura or later
  • Thunderbolt 4 / USB4 port

🖥️ iMac (수신)

🖥️ iMac (receiver)

  • Thunderbolt 3(USB-C) 포트 = 2017년 이후 iMac
  • 27" 5K (2017/2019/2020), 21.5" 4K (2017), 24" (M1, 2021~)
  • macOS 13 Ventura 이상
  • Intel · Apple Silicon 모두 지원
  • iMac with Thunderbolt 3 (USB-C) = 2017 or later
  • 27" 5K (2017/2019/2020), 21.5" 4K (2017), 24" (M1, 2021+)
  • macOS 13 Ventura or later
  • Intel & Apple Silicon supported

※ Target Display Mode를 지원하지 않는 2017년 이후 iMac을 다시 모니터로 살려줍니다.

※ Revives post-2017 iMacs (which dropped Target Display Mode) as a usable display again.

※ 노트북 전용이 아닙니다 — M시리즈 iMac이나 Mac Studio의 두 번째 모니터로도 그대로 씁니다. 데스크탑 Mac에서는 화면을 끌 내장 패널이 없으므로 '클램셸' 모드만 해당되지 않고, 확장·미러는 동일하게 동작합니다.

※ Not just for laptops — use it as a second display for an M-series iMac or Mac Studio too. On a desktop Mac there's no built-in panel to switch off, so only "Clamshell" doesn't apply; Extend and Mirror work exactly the same.

가격

Pricing

7일 무료 체험 후, 비슷한 앱들보다 훨씬 저렴하게.

7 days free, then far cheaper than the alternatives.

한 번 구매 · 평생 사용One-time · lifetime
$24.99 1회 once
✨ 7일 무료 체험
✨ 7-day free trial
  • 모든 기능 포함
  • All features included
  • 무료 업데이트
  • Free updates
  • 맥 2대까지 사용
  • Use on up to 2 Macs
무료 다운로드 (7일 체험) Download free (7-day trial) 바로 구매 ($24.99) Buy now ($24.99)
VISA AMEX Apple Pay PayPal

다운로드해서 7일 무료 · 이후 앱 안에서 라이선스 키로 잠금해제

Download & use free for 7 days · unlock with a license key after

DuoScreen v1.1

🔑 이미 구매하셨나요? 라이선스 키 다시 보기 → 🔑 Already purchased? Retrieve your license key →

주문 시 사용한 이메일을 입력하면 로그인 링크가 메일로 전송됩니다.

Enter your purchase email and a secure login link is emailed to you.

PRO · 한 번 구매 · 평생PRO · one-time purchase · lifetime
$44.99 1회 once
Standard의 모든 기능 +
Everything in Standard, plus
  • 간편 파일 공유
  • Easy file sharing
  • 아이맥 USB 포트 활용
  • Use the iMac's USB ports
  • 썬더볼트 저장장치 공유
  • Thunderbolt storage sharing
  • 안드로이드 빌드 & 설치
  • Android build & install
무료 다운로드 (7일 체험) Download free (7-day trial) 바로 구매 ($44.99) Buy now ($44.99)
VISA AMEX Apple Pay PayPal

다운로드해서 7일 무료 · 이후 앱 안에서 라이선스 키로 잠금해제

Download & use free for 7 days · unlock with a license key after

DuoScreen Pro v1.23

이미 Standard를 구매하셨나요? 앱의 [라이선스] 메뉴에서 $20 차액으로 업그레이드하실 수 있습니다.

Already on Standard? Open the app's License menu to upgrade for the $20 difference.

💳 결제가 안 되시나요? Standard·Pro 공통 — 사용 중인 카드의 해외결제(해외승인) 차단 설정을 확인해 주세요. DuoScreen 결제는 해외 결제사(Lemon Squeezy)를 통해 처리되어, 해외결제가 막혀 있으면 실패할 수 있습니다. (카드사 앱·고객센터에서 해외결제 허용으로 변경)

왜 DuoScreen인가

Why DuoScreen

같은 일을 하는 앱들과 비교해도 가장 저렴하고, 구독이 없습니다.

The most affordable option for this job — and no subscription.

앱가격결제 방식별도 하드웨어연결
DuoScreen$24.99평생 (1회)불필요썬더볼트·이더넷·Wi-Fi
Luna Display$129.99평생 (1회)동글 필요유선/Wi-Fi
Duet Display~$38/년~구독불필요유선/Wi-Fi
Deskreen무료—불필요Wi-Fi(네트워크)
AppPriceBillingExtra hardwareConnection
DuoScreen$24.99Lifetime (one-time)NoneThunderbolt · Ethernet · Wi-Fi
Luna Display$129.99Lifetime (one-time)Dongle requiredWired/Wi-Fi
Duet Display~$38/yr+SubscriptionNoneWired/Wi-Fi
DeskreenFree—NoneWi-Fi (network)

※ 가격·정보는 2026년 기준이며 변동될 수 있습니다. DuoScreen은 Astropad(Luna)·Kairos(Duet)와 무관합니다.

※ Prices & details as of 2026; subject to change. DuoScreen is not affiliated with Astropad (Luna) or Kairos (Duet).

자주 묻는 질문

FAQ

2017년 이후 아이맥은 왜 타겟 디스플레이 모드가 안 되나요?Why doesn't Target Display Mode work on my 2017+ iMac?

애플이 2014~2017년 이후 모델부터 타겟 디스플레이 모드(Target Display Mode)를 제거했습니다. DuoScreen은 썬더볼트/USB4 케이블로 그 기능을 대신 제공해, 오래된 iMac을 다시 외부 모니터로 쓸 수 있게 합니다.

Apple removed Target Display Mode on iMacs from 2014–2017 onward. DuoScreen brings that capability back over a Thunderbolt/USB4 cable, so you can use an old iMac as an external monitor again.

Luna Display·Duet와 무엇이 다른가요?How does DuoScreen compare to Luna Display and Duet?

DuoScreen은 일회성 $24.99로, 살 동글도 없고 연 구독도 없습니다. Luna Display는 일회성이지만 전용 동글(약 $80~130)이 필요하고, Duet은 구독 방식입니다. 자세한 표는 위 ‘왜 DuoScreen인가’ 비교를 보세요.

DuoScreen is a one-time $24.99 — no dongle to buy, no yearly subscription. Luna Display is one-time but needs a proprietary dongle (~$80–130), and Duet is a subscription. See the ‘Why DuoScreen’ comparison above.

오래된 아이맥을 맥북의 외부 모니터로 쓸 수 있나요?Can I use an old iMac as an external monitor for my MacBook?

네. DuoScreen을 양쪽 Mac에 설치하고 썬더볼트/USB4 케이블로 직접 연결하면, iMac이 맥북의 5K 확장(또는 미러) 모니터가 됩니다. Wi-Fi 없이 유선으로 동작합니다.

Yes. Install DuoScreen on both Macs and connect them with a Thunderbolt/USB4 cable — the iMac becomes a 5K extended (or mirrored) display for your MacBook. It works over a wire, no Wi-Fi.

리시버 앱을 실행했는데 아무것도 안 떠요 / 실행이 안 돼요I ran the Receiver but nothing happens / it won't launch

1) 창이 바로 안 떠도 정상입니다. DuoScreen Receiver는 상주 앱이라 화면 오른쪽 위 🖥️ 아이콘으로 뜹니다. 아이콘이 보이면 정상 실행 중이며, 맥북에서 연결하면 자동으로 화면이 켜집니다. (2.0부터는 그 아이콘에서 창 열기로 연결 상태·음량을 볼 수 있습니다.)
2) 그래도 안 뜬다면 'AirPlay 수신 모드'를 꺼주세요. 이 기능이 켜져 있으면 같은 네트워크 포트를 먼저 차지해 앱이 실행되지 못할 수 있습니다: 시스템 설정 › 일반 › AirDrop 및 Handoff › AirPlay 수신 모드 끄기 후 다시 실행. (최신 버전은 이 충돌을 자동 회피합니다 — 앱 메뉴에서 업데이트하세요.)

1) A missing window is normal. DuoScreen Receiver is a menu-bar app — it only shows a 🖥️ icon at the top-right. If you see it, it's running; the screen turns on automatically once your Mac connects.
2) If it still won't launch, turn off 'AirPlay Receiver'. When enabled it grabs the network port first and can stop the app from starting: System Settings › General › AirDrop & Handoff › turn off AirPlay Receiver, then reopen. (The latest version avoids this conflict automatically — update from the app menu.)

어떤 아이맥과 맥북이 지원되나요?Which iMacs and Macs are supported?

모니터가 되는 쪽은 썬더볼트 3 / USB-C 포트가 있는 2017년 이후 iMac(인텔·Apple Silicon 모두 가능)이고, 본체가 되는 쪽은 Apple Silicon Mac입니다. 맥북뿐 아니라 M시리즈 iMac·Mac Studio·Mac mini·Mac Pro도 본체로 쓸 수 있습니다. 두 Mac을 40Gbps 썬더볼트/USB4 케이블로 연결합니다.

The display side is a 2017-or-later iMac with Thunderbolt 3 / USB-C (Intel or Apple Silicon). The source side must be an Apple Silicon Mac — not only a MacBook, but also an M-series iMac, Mac Studio, Mac mini or Mac Pro. Connect them with a 40Gbps Thunderbolt/USB4 cable.

맥북이 아니라 iMac·Mac Studio의 두 번째 모니터로도 쓸 수 있나요?Can I use it as a second display for an iMac or Mac Studio, not a MacBook?

네. 본체가 되는 쪽은 Apple Silicon Mac이면 어떤 모델이든 됩니다 — M시리즈 iMac, Mac Studio, Mac mini, Mac Pro 모두 맥북과 똑같이 동작합니다. 예를 들어 Mac Studio에 쓰던 iMac을 붙여 두 번째 화면으로 쓰거나, M시리즈 iMac 옆에 예전 iMac을 세로 화면으로 두는 식입니다. 확장·미러 모드와 캡처·소리 출력 선택도 모두 동일하게 쓸 수 있고, 노트북 덮개를 닫는 '클램셸' 모드만 데스크탑 Mac에는 해당되지 않습니다.

Yes. The source can be any Apple Silicon Mac — M-series iMac, Mac Studio, Mac mini or Mac Pro all behave exactly like a MacBook. For example, attach a spare iMac to a Mac Studio as a second screen, or park an older iMac in portrait next to your M-series iMac. Extend and Mirror, capture and sound-output selection all work the same; only "Clamshell" (closing a laptop lid) doesn't apply to a desktop Mac.

Wi-Fi가 필요한가요? 화면 지연은 어떤가요?Does it need Wi-Fi? What about latency?

썬더볼트 직결이 가장 좋습니다(5K 풀성능·최저지연, Wi-Fi 없이도 동작). 같은 네트워크라면 이더넷·Wi-Fi로도 연결되지만, 속도·지연은 연결 방식에 따라 달라집니다. 하드웨어 HEVC 인코딩으로 저지연·고화질입니다.

Thunderbolt is best (full 5K, lowest latency, works without Wi-Fi). On the same network it also works over Ethernet or Wi-Fi, though speed & latency vary by connection. Uses low-latency hardware HEVC encoding.

확장 모드와 미러 모드를 모두 지원하나요?Does it support both extended and mirror modes?

네. 확장(두 번째 모니터), 미러(같은 화면 복제), 클램셸(맥북 덮개 닫고 사용) 세 가지 모드를 지원하며 메뉴에서 바꿀 수 있습니다.

Yes — Extended (second monitor), Mirror (same screen), and Clamshell (lid closed). Switch anytime from the menu.

아이맥(확장) 화면을 캡처할 수 있나요?Can I screenshot the iMac (extended) screen?

네, macOS 기본 스크린샷(⌘⇧4)이 그대로 동작합니다. 확장 화면이 진짜 디스플레이로 잡히기 때문에, 아이맥 화면 위에서 영역을 드래그하면 됩니다. 영상이 아니라 원본에서 떠오므로 압축 없이 또렷하고, 파일은 맥북 바탕화면에 저장됩니다.
여기에 더해 아이맥 화면만 한 번에 담는 단축키도 있습니다 — ⌃⌥⌘4 전체, ⌃⌥⌘5 영역 선택.

Yes — the macOS screenshot you already use (⌘⇧4) works there. The extended screen is a real display to macOS, so you just drag a region on the iMac screen. It is captured from the original framebuffer rather than the video stream, so there is no compression loss, and the file lands on your Mac's Desktop.
On top of that, two shortcuts grab the iMac screen alone in one go — ⌃⌥⌘4 for all of it, ⌃⌥⌘5 to drag a region.

업데이트는 어떻게 되나요?How do updates work?

앱이 하루 두 번 새 버전을 자동 확인하고, 메뉴에서 클릭 한 번이면 받아서 교체·재시작까지 자동으로 진행됩니다.

The app checks for new versions twice a day; one click in the menu downloads, replaces, and relaunches automatically.

가격은 얼마이고 무료 체험이 있나요?How much is it, and is there a free trial?

7일 무료 체험 후 일회성 US$24.99입니다(구독 아님). 맥 2대까지 사용 가능합니다.

A 7-day free trial, then a one-time US$24.99 (not a subscription). Use on up to 2 Macs.

업데이트 내역

What's new

앱은 자동으로 업데이트를 확인합니다 — 메뉴바 아이콘에서 새 버전을 받을 수 있어요.

The app checks for updates automatically — grab the latest from the menu-bar icon.
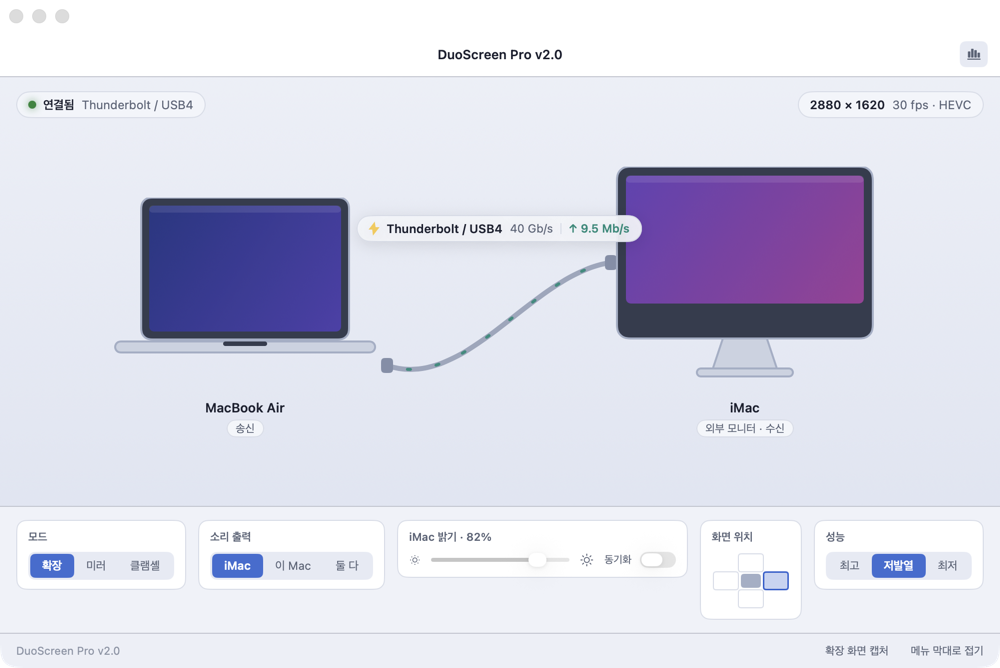
DuoScreen 2.0 앱 창 — 맥북과 아이맥, 연결 케이블과 속도, 모드·소리·밝기·화면 위치·성능

2.0의 새 앱 창 — 두 Mac과 연결 상태가 한눈에, 아래에서 바로 설정.

The new 2.0 app window — both Macs and the live link at a glance, settings right below.